App原生与跨平台开发

当下App开发可采用:1、原生开发(如android选择JavaKotliniOS可选择Objective-CSwift),2、跨平台开发(React NativeFlutter)。

由于笔者最近也接触跨平台开发,这里顺便介绍一下Flutter和React Native这两个当下非常热门的跨品台应用开发框架的对比,后续若要在二者间选型可简单参考。

1、首先主要关注性能方面:

  • Flutter是谷歌推出的框架,采用谷歌自家的Dart语言、拥有良好的性能,原因是Dart可以直接编译为ARM代码和Fiasco微内核并且使用自己的渲染引擎Skia。Skia同时也是Android系统的图形渲染引擎之一,iOS的渲染引擎有Quartz 2D、OpenGL ES、Metal、Core Animation、Core Image。
  • React Native需要在JavaScript线程和原生线程之间频繁切换上下文,对性能有一定的影响。

2、UI组件:

  • Flutter:
  • React Native:

3、开发语言:

  • Flutter:Google的Dart
  • React Native:Java Script

4、社区和生态:

  • Flutter:快速发展中
  • React Native:发布更早,有比较成熟的社区,插件和三方库较多。

5、热重载:二者都支持热重载,与原生相比可能快速地调试。

设计一个证券交易App

前言:

本篇文章从iOS开发者的角度,介绍证券交易App的一些技术选型功能设计等方面的内容。涉及到与server的交互数据格式及定义、接口设计、功能设计等。

一、App编程语言及三方库

iOS端采用原生开发,编程语言是Swift。如果某些功能需要在双端同时实现可使用Flutter。最近也参与了Flutter的跨平台开发,这篇文章简单介绍。

部分第三方库:

  • 网络:AlamofireStarscreamSocketIO
  • 数据解析:HandyJSONSwiftProtobufSwiftyJSON
  • 布局:SnapKit
  • 网络图片:Kingfisher
  • 键盘输入:IQKeyboardManagerSwift
  • 缓存:Track
  • 弹框:Toast-Swift
  • 数据库:WCDB.swift

二、网络部分

1、网络通信协议

常见的应用层通信协议HTTPSMTPWeb Socket等,这里介绍当前项目使用到的两种:

HTTP(HyperText Transfer Protocol,超文本传输协议):

  • 是一种网页(HTML)传输协议,适用于从万维网服务器传输超文本到本地浏览器的传送协议。
  • 是一种请求-响应协议,客户端发送一个请求给服务器,然后服务器回送一个响应回来。这种通讯方式限制了只能有客户端发起通信,服务器不能主动给客户端发送数据。

Web Socket:

  • 是一种在单个 TCP 连接上进行全双工通信的协议。目标就是在网页和服务器之间建立持久连接,然后进行双向数据传输。
  • 比起 HTTP(HTTP 协议中,服务器不能主动向客户端推送信息),WebSocket 更适合于实时性要求较高的场景,例如网页聊天,股票行情,游戏等。

2、数据编码格式

网络通信中传递的是数据,那么如何组织这些数据编称作“编码”,常见的有XMLJSON这两种格式,在app开发中也几乎不会用XML这种格式了。另外一种是Google推出的Protocol Buffers(简称ProtoBuf或PB)。

JSON (JavaScript Object Notation) 是一种轻量级的数据交换格式,易于人阅读和编写,同时也易于机器解析生成。JSON 使用完全独立于语言的文本格式,采用 Key-Value 键值对的方式来存储和表示数据,常用于服务器Web 应用间的数据交换。

ProtoBuf,全称 Protocol Buffers,是 Google 公开的一种数据序列化协议,用于数据结构的序列化,可以用于数据存储通信协议等方面。相较于 JSON、XML 这些数据格式,ProtoBuf 更小更快、也更简单。它使用二进制格式,可以定义复杂的数据结构,还提供了众多语言的 API 接口,可用于网络通讯和数据存储。约定的数据结构能够被跨语言使用,比如 Server 使用 C++,Client 使用 Java,两者之间的通信,可以使用 ProtoBuf 来约定通信协议。

总体上,JSON 更简单易用,并且在WebView、Web Browser 这样的环境中使用更加便利。而 ProtoBuf 则适合于大规模的系统中,需要更高效或者更清晰的协议定义的地方。

我们当前讨论的证券交易App在查看行情的过程中需要接受大量的行情数据,同时对时效性有较高的要求。PB体积小(二进制格式)、效率高(编解码),也支持跨语言,同时Google也提供了完整的工具链(如将.proto格式的文件编译成目标语言如Swift文件),特别适合证券类高频率、大数据量的场景。

3、安全性

// TODO: –

三、主要的业务逻辑

1、与行情服务器建立WebSocket连接

WebSocket 是一个网络通信协议,提供了全双工(Full-duplex)通讯机制。在 WebSocket API 中,客户端(可以是web浏览器或app)和服务器只需要建立一次连接,就可以进行实时双向数据传输。这种协议的主要目标是在客户端和服务器之间实现实时通讯,同时也兼容了现有的 HTTP 协议。

建立WebSocket连接需要知道服务器ip地址端口号port,其URIws://wss://开头,如:"ws://172.16.10.207:11516",其中wss://多了一层security layer实现加密

通常我们会将行情服务器信息ServerInfo保存到本地,并提供更新接口。这样可以加速与行情服务器建立WebSocket连接的过程。如果本地未读取到则需要调用接口获取行情服务器信息,再建立连接、同时保存到本地

2、数据的发送与接收

消息的格式: 容器 消息类型 + 消息体,

数据的发送

数据接收后的解析,传递给业务层

3、登录

检查登录状态

检查refreshtoken是否过期

刷新refreshtoken

单点登录

多点登录

4、在线状态

心跳

踢下线

四、启动后要做的一些事情

1、网络方面

网络状态检测 如果有网络的话,要建立websocket的连接 还要检查登录状态,refreshtoken等,同步用户数据

Spring Boot RESTful demo

前言

这边文章介绍创建一个基于RESTful的网络服务web service,并介绍一些相关的概念。

最终我们需要实现:访问"http://localhost:8080/greeting?name=Hsiao"后,在浏览器显示以下内容:

rest-service_RESTful_api_greeting_with_name

参考:https://spring.io/guides/gs/rest-service

什么是RESTful?

什么是web service?

一、Spring初始化

官方的的页面:https://start.spring.io/ 我们按照以下配置

  • Project:选择Marven
  • Language:选择Java
  • Spring Boot:选择3.2.3
  • Project Metadata:Artifact设为rest-servicePackaging选择JarJava选择17
  • Dependencies:添加Spring Web
rest-service_RESTful_demo_initialize

点击Generate后会下载rest-service.zip,将其解压得到rest-service并在VS Code中打开后,默认是这样的:

二、创建record Greeting

我们这个web service网络服务将要响应/greeting接口GET请求,该请求有一个可选的String类型参数name

在我们的响应中,响应头200 OK表示响应成功,同时我们需要把一个Greeting实例greetingObj放在响应体

Greeting实例的一个实例如下:

{
    "id": 1,
    "content": "Hello, World!",
}

其中的id字段是生成的问候语的唯一标识符,它是全局自增不会重复的,换言之每次响应这个接口返回的id都会不一样,且是全局自增的。content是问候的具体内容

创建record Greeting

java/com/example/restservice处右键,依次选择New Java File -> Record

rest-service_RESTful_add_Java_record

给record命名Greeting

rest-service_RESTful_add_Java_record_Greeting

默认的Greeting:

rest-service_RESTful_record_Greeting_default

我们将其修改成Greeting.java

package com.example.restservice;

public record Greeting(long id, String content) {

}
rest-service_RESTful_record_Greeting_edit

三、创建class GreetingController

java/com/example/restservice处右键,依次选择New Java File -> Class

rest-service_RESTful_add_Java_class

给class命名GreetingController

rest-service_RESTful_add_Java_class_GreetingController

将其修改成 GreetingController.java

package com.example.restservice;

import java.util.concurrent.atomic.AtomicLong;

import org.springframework.web.bind.annotation.GetMapping;
import org.springframework.web.bind.annotation.RequestParam;
import org.springframework.web.bind.annotation.RestController;

@RestController
public class GreetingController {

    private static final String template = "Hello, %s";
    private final AtomicLong counter = new AtomicLong();

    @GetMapping("/greeting")
    public Greeting greeting(@RequestParam(value = "name", defaultValue = "World") String name) {
        return new Greeting(counter.incrementAndGet(), String.format(template, name));
    }

}
rest-service_RESTful_class_GreetingController_edit

四、运行

VS Code点击运行后,访问"http://localhost:8080/greeting"将会显示以下:

rest-service_RESTful_api_greeting

若在访问该接口时带上参数name,如"http://localhost:8080/greeting?name=Hsioao",我们的greeting()方法能解析到name参数是“Hsiao”,所以不再使用默认的参数“World”:

rest-service_RESTful_api_greeting_with_name

五、总结

Spring Boot quick start

前言

Spring是一个Java框架,可以用于MicroservicesReactiveCloudWeb AppServerlessEventDrivenBatch等,具有应用广泛、高效、灵活、高速、安全、丰富的社区支持等特性

官网:https://spring.io

当前文章的主要内容是启动一个Spring Boot项目,它具有一个/hello接口,这个接口支持传递name参数,如果没有读取到name参数,则使用默认值的World,并基于name参数返回一个字符串

1、下载demo

在官网http://start.spring.io生成一个demo。

该页面的Project选择MavenSpring Boot选择3.2.3,在Add Dependence中搜索web并选择Spring Web,最后点击下方的Generate按钮就会下在一个demo.zip

spring boot generate

解压后得到的文件结构如下:

demo

2、新增hello函数及接口

这里使用VS Code打开demo,并修改源码如下:

DemoApplication.java

DemoApplication.java

package com.example.demo;

import org.springframework.boot.SpringApplication;
import org.springframework.boot.autoconfigure.SpringBootApplication;
import org.springframework.web.bind.annotation.GetMapping;
import org.springframework.web.bind.annotation.RequestParam;
import org.springframework.web.bind.annotation.RestController;

@SpringBootApplication
@RestController
public class DemoApplication {

	public static void main(String[] args) {
		SpringApplication.run(DemoApplication.class, args);
	}
	@GetMapping("/hello")
	public String hello(@RequestParam(value = "name", defaultValue = "World") String name) {
		return String.format("Hello %s", name);
	}
}

介绍一下新增的hello()方法

该方法接收一个String类型的参数name,并用字符串Hello与其拼接,返回拼接之后的字符串。举个例子如果传入的name=Jack,那么最终返回的是一个"Hello Jack"字符串

类名之上@RestController声明意味着当前代码是一个支持web后端代码

方法声明之前@GetMapping("/hello")表示我们的hello()方法是用于响应发送到"http://localhost:8080/hello"地址的请求。

hell0()函数签名中,位于name之前的@RequestParam(value = "name", defaultValue = "World")意味着希望从请求中读取name字段,若未读取到该字段则使用默认的字符串"World"传递给当前函数的参数name

在我们编辑代码的同时会自动导入所需要的包,如顶部的import org.springframework.web.bind.annotation.RestController;等。

3、启动并调试该接口

点击VS Code右上角的三角形▶️按钮即可运行当前程序。运行成功后会在控制台的terminal显示以下内容:

spring boot run

如果需要停止运行,点击以下Disconnect按钮即可:

spring disconnect

在程序运行过程中,我们在浏览器访问"http://localhost:8080/hello",将会看到以下内容:

http://localhost:8080/hello

这表示我们访问本地服务器的/hello接口,并且没有带任何参数。由于我们的hello()方法在没有读取到name参数时会使用默认的"World"字符串当作默认参数,所以最终我们看到浏览器显示了拼接Hello之后的字符串"Hello World"

我们再尝试带上指定的name参数Hsiao:再次访问"http://localhost:8080/hello?name=Hsiao",此时浏览器将显示:

“http://localhost:8080/hello?name=Hsiao”

iOS制作私有库

前言:

在项目使用私有库,能带来以下好处:

  • 代码复用:可以很方便地在多个项目中使用一份代码
  • 模块化:比如可以按照业务模块/公共模块/基础模块将代码分类到不同的库中,使项目整体结构清晰、同时可以减少代码间的耦合,提高代码质量
  • 易于维护:当业务变化时,只需在私有库中更新,然后就能轻松推送到使用这个私有库的所有项目中。
  • 提升开发效率:一次编写,就能在多个项目重化工复用,提高开发效率,节省时间。
  • 持续集成:可以与CI/CD工具集成。私有库更新后可以自动地被推送到所有相关的项目中,让项目都能使用最新版本的库。

1、前期准备

  • 安装并使用CocoaPods

2、创建过程

假设我们的库的名称就叫XPod,只需要在目标文件夹中,使用创建指令

pod lib create XPod

需要设置用户名邮箱

Cloning `https://github.com/CocoaPods/pod-template.git` into `XPod`.
Configuring XPod template.
! Before you can create a new library we need to setup your git credentials.
security: SecKeychainSearchCopyNext: The specified item could not be found in the keychain.

 What is your name?
 > XW

! Setting your name in git to XW
  git config user.name "XW"

 What is your email?
 > admin@xiaowen.com

! Setting your email in git to admin@xiaowen.com
  git config user.email "admin@xiaowen.com"
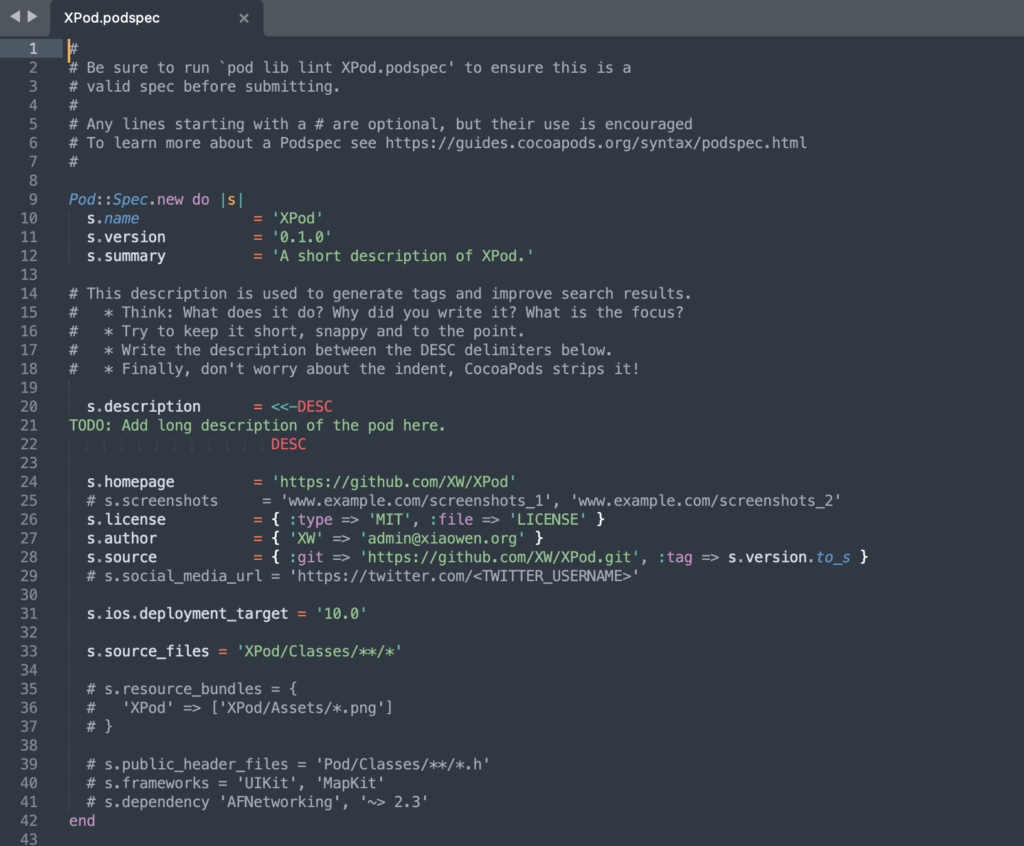
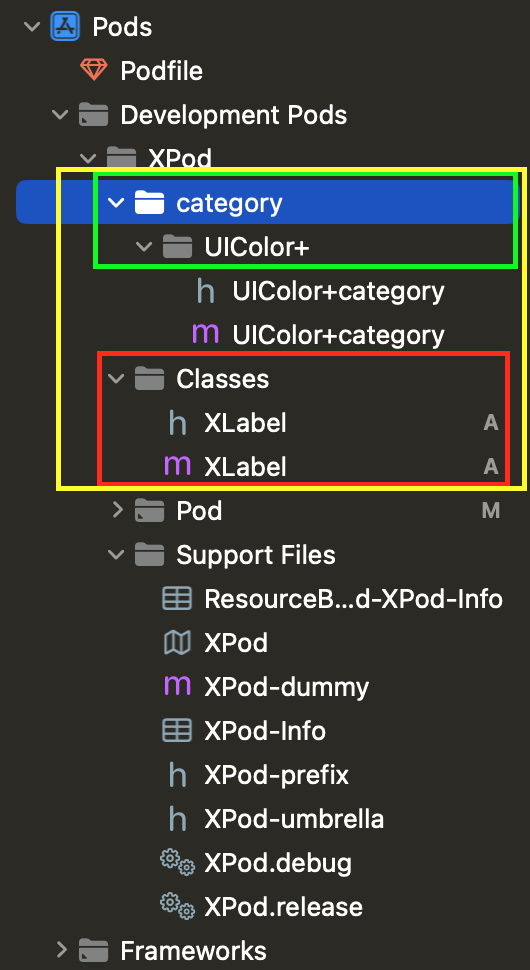
------------------------------

然后根据提示配置lib,如platformlanguage等等,即可完成默认的创建过程

To get you started we need to ask a few questions, this should only take a minute.

2024-03-06 15:45:36.289 defaults[9529:76159]
The domain/default pair of (org.cocoapods.pod-template, HasRunBefore) does not exist
If this is your first time we recommend running through with the guide:
 - https://guides.cocoapods.org/making/using-pod-lib-create.html
 ( hold cmd and click links to open in a browser. )

 Press return to continue.


What platform do you want to use?? [ iOS / macOS ]
 > iOS

What language do you want to use?? [ Swift / ObjC ]
 > ObjC

Would you like to include a demo application with your library? [ Yes / No ]
 > No

Which testing frameworks will you use? [ Specta / Kiwi / None ]
 > None

Would you like to do view based testing? [ Yes / No ]
 > No

What is your class prefix?
 > X
security: SecKeychainSearchCopyNext: The specified item could not be found in the keychain.

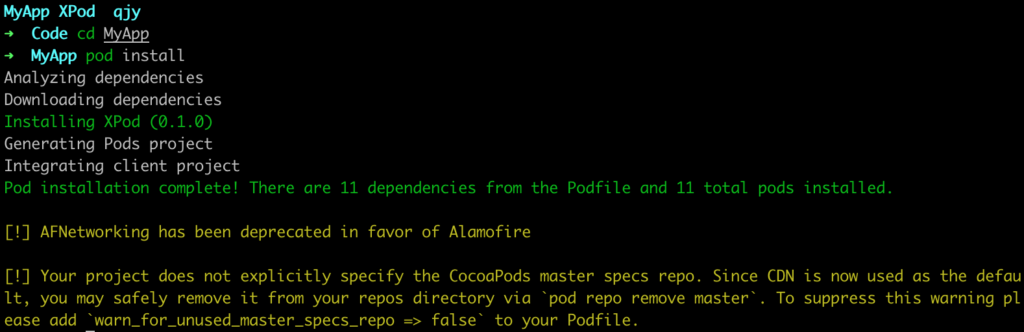
Running pod install on your new library.

Analyzing dependencies
[!] CocoaPods could not find compatible versions for pod "XPod":
  In Podfile:
    XPod (from `../`)

Specs satisfying the `XPod (from `../`)` dependency were found, but they required a higher minimum deployment target.

[!] Automatically assigning platform `iOS` with version `9.3` on target `XPod_Tests` because no platform was specified. Please specify a platform for this target in your Podfile. See `https://guides.cocoapods.org/syntax/podfile.html#platform`.

 Ace! you're ready to go!
 We will start you off by opening your project in Xcode
  open 'XPod/Example/XPod.xcworkspace'
The file /Users/rayvision/Desktop/Code/XPod/Example/XPod.xcworkspace does not exist.

To learn more about the template see `https://github.com/CocoaPods/pod-template.git`.
To learn more about creating a new pod, see `https://guides.cocoapods.org/making/making-a-cocoapod`.
➜  Code

创建完成后的目录是这样的:

XPod

3、自定义配置

podspec是文件库的描述文件,默认是这样的:

XPod.podspec default

s.source_files

source_files通常用于指定源代码文件,而不是资源文件(如图片、音频等),如果想包含资源文件,可以使用s.resource_bundless.resources来指定资源文件的路径。

默认情况下是只包含了Classes目录下的文件

s.source_files = 'XPod/Classes/**/*.{h,m}'

如果我们还想用子文件夹开区分不同模块,比如这里新建了一个叫做category的文件夹来放各种分类,UIColor的分类放在UIColor+这个文件夹中,类似地还可以创建一个叫NSString+的文件夹来存放各种NSString的分类

s.source_files = 'XPod/**/*/.{h,m}'
create pod sub directory

这样配置后,XPod及其子目录下的所有.h和.m文件都会被包含在Pod中。下面绿色部分是我们新增的文件夹,红色部分是默认的文件夹。

xcode pod directory

s.resources

使用s.resources可以将指定的资源文件直接复制到生成的Framework静态库中。这意味着这些资源文件会被直接暴露在Bundle的根目录下,可以通过[NSBundle mainBundle] pathForResource:ofType:等方法访问这些资源文件。

s.resource_bundles

使用s.resource_bundles可以将资源文件打包成一个独立的Bundle,并将这个Bundle作为一个整体引入到Pod中。这样做的好处是可以更好地组织资源文件,避免资源文件之间的命名冲突,也可以更方便地加载和管理资源文件。

s.resource_bundles = {
    'XPod' => ['XPod/Assets/**/*.{png, pdf}']
  }

因此,如果你希望将资源文件直接暴露在Bundle的根目录下,可以使用s.resources;如果你希望将资源文件打包成一个独立的Bundle引入到Pod中,可以使用s.resource_bundles。根据你的需求选择合适的方式来包含资源文件。

4、使用

在我们的项目中要使用XPod也很简单只要在Podfile中新增:

 pod 'XPod', :path => '../XPod'

注意这里使用的是相对路径,然后再执行pod install

XPod install

通常情况下,在开发过程中我们都直接使用本地的私有库。当阶段性地完成开发后,可以将私有库放到git上托管。以下是两种不同的引用库的方式:

本地:

  pod 'XPod', :path => '../XPod'

git:

  pod 'XPod', :git => 'https://git.xiaowen.org/ios/XPod.git', :branch => '0.1.0'

WordPress隐藏文章作者日期等信息

文章默认在标题下都会显示相关信息如:

post on by

如果决定这些不好看,希望移除它们,这里有一个很简单的方法:使用自定义css,具体步骤是:

访问WordPress后台,点击:外观 -> 自定义 -> 附加CSS

在编辑框中输入:

.entry-meta .byline, .entry-meta .cat-links { display: none; }
.entry-meta .posted-on { display: none; }

保存即可。

这样在发布的文章标题下就不会再显示发布时间作者了。

post on by hide

Xcode Simulator

升级Xcode之后创建项目提示需要下载iOS 17.2版本的模拟器

需要下载iOS 17.2 Simulator

下载中⌛️

下载中⌛️

等待很久之后报下载失败

下载失败💔

原因是失去了网络连接

失败原因:lost connection

重试很多次依然如此,但是可以排除网络问题。在开发者论坛看到类似的讨论:same issuehttps://forums.developer.apple.com/forums/thread/740040

跳转到苹果官方给出的方案:https://developer.apple.com/documentation/xcode/installing-additional-simulator-runtimes#

install and manager simulator runtimes

最终解决方案是,手动下载然后通过命令行安装

模拟器下载地址:https://developer.apple.com/download/all/ 进入这里需要登录开发者账号。

Apple download all

搜索模拟器iOS Simulator

Apple downloading search simulator

出现很多版本的模拟器,包括iOS17.4 beta,这里我们只需要iOS 17.2,所以我们搜索指定版本

iOS 17.2 Simulator search

找到指定版本,点击View Details即可看到下载runtime.dmg的地址

iOS 17.2 Simulator downloading

点击即可下载⏬。

simulator手动下载中⌛️

这里直接给出具体的下载链接🔗 👇https://download.developer.apple.com/Developer_Tools/iOS_17.2_Simulator_Runtime/iOS_17.2_Simulator_Runtime.dmg

安装方法:

sudo xcode-select -s /Applications/Xcode.app

需要输入密码,然后

xcodebuild -runFirstLaunch

接着:

xcrun simctl runtime add "/Users/rayvision/Downloads/iOS_17.2_Simulator_Runtime.dmg"

这里引号内的地址,可以直接找到下载的文件拖拽过来,会验证runtime。

simulator runtime validate

最后验证完成出现👇就完成了。

D: F56EFCE4-115C-490B-881C-C86B00B23EEB iOS (17.2 - 21C62) (Ready)

simulator add

zsh自动填充插件zsh-autosuggestionszsh

brew安装

brew install zsh-autosuggestions

Logs:

Last login: Wed Mar  6 10:07:19 on ttys000
➜  ~ brew install zsh-autosuggestions
==> Downloading https://formulae.brew.sh/api/formula.jws.json
##O=-#     #
==> Downloading https://formulae.brew.sh/api/cask.jws.json
##O=-#     #
==> Downloading https://ghcr.io/v2/homebrew/core/zsh-autosuggestions/manifests/0.7.0-1
############################################################################################################################################################################## 100.0%
==> Fetching zsh-autosuggestions
==> Downloading https://ghcr.io/v2/homebrew/core/zsh-autosuggestions/blobs/sha256:4537653cbf3540a0785481966b36291255839f1be4012a22409ef97c46a1860b
############################################################################################################################################################################## 100.0%
==> Pouring zsh-autosuggestions--0.7.0.all.bottle.1.tar.gz
==> Caveats
To activate the autosuggestions, add the following at the end of your .zshrc:

  source /opt/homebrew/share/zsh-autosuggestions/zsh-autosuggestions.zsh

You will also need to restart your terminal for this change to take effect.
==> Summary
🍺  /opt/homebrew/Cellar/zsh-autosuggestions/0.7.0: 6 files, 44.8KB
==> Running `brew cleanup zsh-autosuggestions`...
Disable this behaviour by setting HOMEBREW_NO_INSTALL_CLEANUP.
Hide these hints with HOMEBREW_NO_ENV_HINTS (see `man brew`).

根据上述提示,编辑~/.zshrc:在末尾追加

source /opt/homebrew/share/zsh-autosuggestions/zsh-autosuggestions.zsh

最后,使之生效

source ~/.zshrc

效果:

zsh高亮插件zsh-syntax-highlighting

brew安装

brew install zsh-syntax-highlighting

logs:

Last login: Tue Mar  5 15:41:48 on ttys000
➜  ~ brew install zsh-syntax-highlighting
==> Downloading https://formulae.brew.sh/api/formula.jws.json
############################################################################################################################################################################## 100.0%
==> Downloading https://formulae.brew.sh/api/cask.jws.json
############################################################################################################################################################################## 100.0%
==> Downloading https://ghcr.io/v2/homebrew/core/zsh-syntax-highlighting/manifests/0.8.0
############################################################################################################################################################################## 100.0%
==> Fetching zsh-syntax-highlighting
==> Downloading https://ghcr.io/v2/homebrew/core/zsh-syntax-highlighting/blobs/sha256:603dabae4003cd3d95ab7f872a7fd9944e67cf0d963ffe42a07c8f3c191211ea
############################################################################################################################################################################## 100.0%
==> Pouring zsh-syntax-highlighting--0.8.0.arm64_sonoma.bottle.tar.gz
==> Caveats
To activate the syntax highlighting, add the following at the end of your .zshrc:
  source /opt/homebrew/share/zsh-syntax-highlighting/zsh-syntax-highlighting.zsh

If you receive "highlighters directory not found" error message,
you may need to add the following to your .zshenv:
  export ZSH_HIGHLIGHT_HIGHLIGHTERS_DIR=/opt/homebrew/share/zsh-syntax-highlighting/highlighters
==> Summary
🍺  /opt/homebrew/Cellar/zsh-syntax-highlighting/0.8.0: 27 files, 203.4KB
==> Running `brew cleanup zsh-syntax-highlighting`...
Disable this behaviour by setting HOMEBREW_NO_INSTALL_CLEANUP.
Hide these hints with HOMEBREW_NO_ENV_HINTS (see `man brew`).
➜  ~ 

根据上述提示,编辑~/.zshrc:在末尾追加

source /opt/homebrew/share/zsh-syntax-highlighting/zsh-syntax-highlighting.zsh

最后,使之生效

source ~/.zshrc

效果:

使用之前
使用之前

使用之后
使用之后